


Foundry is an Ethereum development platform that provides tools for managing your dependencies, testing, running, and deploying your project. It also allows you to interact with your project from the command line.
In this tutorial, you’ll learn how to register our smart contract to the Mode SFS contract with Foundry.
Prerequisites
Before you continue with this tutorial you should:
Have Foundry Installed
Bridge Sepolia Eth with Mode Network.
Have an Ethereum wallet preferably Metamask Installed.
A basic understanding of Solidity.
The Register Function in the SFS contract
Mode’s SFS contract lets developers get some percentage of the transaction fees from their contracts' activities on the Mode network. For this to work, your smart contract has to be registered to Mode’s SFS contract. Once registered, you get an ERC 721 NFT (Non-Fungible Token) which allows you to claim your share of the transaction fees generated from your contract.
To register, your smart contract must call the SFS contract's register function. Let’s look at the register function to understand how it works.
Note that this is only a portion of the SFS contract, check here to see the complete code.
function register(address _recipient) public onlyUnregistered returns
(uint256 tokenId) {

   address smartContract = msg.sender;

// Check if the recipient address is valid; revert if it's null
   if (_recipient == address(0)) revert InvalidRecipient();

// Generate a unique tokenId, mint an NFT to the recipient with it, and update
//the tracker
   tokenId = _tokenIdTracker.current();
   mint(recipient, tokenId);
   _tokenIdTracker.increment();
   emit Register(smartContract, _recipient, tokenId);

// Update the fee recipient mapping for the smart contract, associating it with
//the tokenId and registration details
   feeRecipient[smartContract] = NftData({
       tokenId: tokenId,
       registered: true,
       balanceUpdatedBlock: block.number
   });

}
This function receives _recipient as an input and then mints an NFT to this recipient once your smart contract is registered.
Then, the msg.sender is picked up as the contract to register in the SFS updating the mapping with relevant information.
Here are a few things to note;
The function is specified public meaning an external smart contract can call it.
The msg.sender is assumed to be a smart contract address, ensuring that a smart contract can register a fee recipient.
The function mints an ownership NFT that allows the owner to claim fees earned by the recipient smart contract.
Now that we’ve understood how the register function works, let’s set up our project.
1. Creating your Project
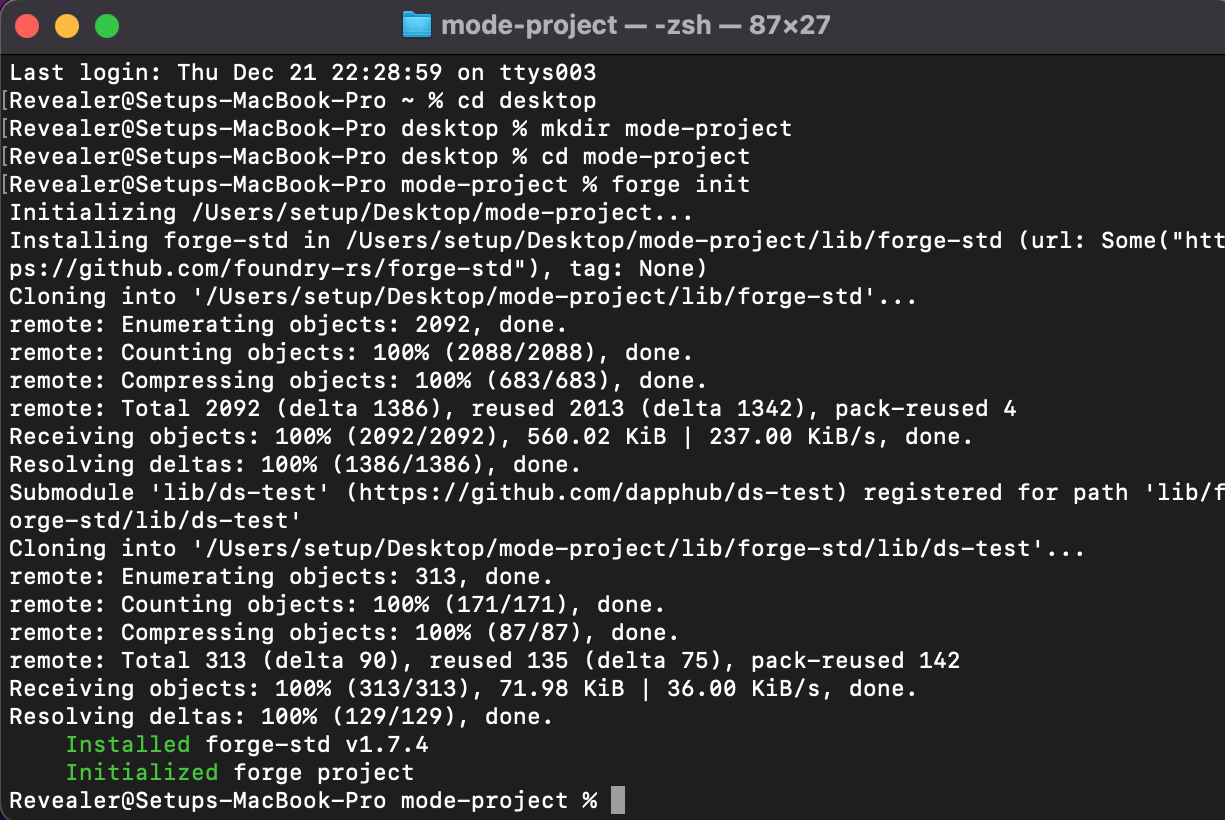
To Initialize a new project with Forge open up your terminal and run;
$ mkdir mode-project
$ cd  mode-project
$ forge init
This creates a project structure, you can configure it according to your taste but for this tutorial, we would be sticking with the default structure and only make minor changes to our file.
2. Writing your Contract
We won’t be making use of Openzepplin in this tutorial, but because you’d be making use of it frequently I’d give you the steps. Apply if you want to add it to your project.
Install the Openzeppelin library inside your project by running;
$ forge install openzeppelin/openzeppelin-contracts
This would add the openzeppelin library to the lib/openzeppelin-contracts directory and you can make use of it with a simple import.
Note: For Forge to find this dependency you have to create a remappings.txt file at the top level of your project.
Add this line to the file
@openzeppelin/=lib/openzeppelin-contracts/
With that said, head to the src folder and replace the contract with this one. Also, don’t forget to delete the test file.
// SPDX-License-Identifier: UNLICENSED
pragma solidity ^0.8.13;
contract Register {
  function register(address _recipient) public returns (uint256 tokenId) {}
}
contract ModeTest {
  uint public value;

  constructor(uint _initialValue) {
      value = _initialValue;
      Register sfsContract = Register  (0xBBd707815a7F7eb6897C7686274AFabd7B579Ff6);
      sfsContract.register(msg.sender);
  }
  function updateValue(uint _newValue) public {
      value = _newValue;
  }
}
3. Compiling your Contract
To compile your contract simply run;
$ forge build
4. Deploying your Contract
To deploy your contract run;
mode-project % forge create --rpc-url https://sepolia.mode.network \
--constructor-args 100 \
--private-key <Your Private Key> src/Mode.sol:ModeTest
The constructor args was added because we have to provide arguments for our constructor.
Replace the private key completely with your private key, it should return something like this.
[⠑] Compiling…
No files changed, compilation skippedDeployer: 0x08755B4d595AFA790d760CF499778f8ff610607EDeployed to: 0x1a06b0ba12Bb0568c7BDEEf1e4573Dd78C74544fTransaction hash: 0x95b9fbd23bdc9513cb089a64287b87e1642508f2fcc123b3c6a4dbe0c5cd3e1b
Congratulations! You just deployed and registered your contract with Foundry.
Check the Explorer
To view your transaction head to Mode Testnet and paste the contract address. Your contract should be assigned to the NFT tokenId. To verify if you assigned your contract correctly, you can check our “Check the registry” guide.
To import the NFT to your wallet, check our Adding the SFS NFT to your wallet tutorial.