


In this comprehensive guide, you will learn about Mode Network and its unique approach to Ethereum scalability. Mode leverages the Optimism stack to introduce a Layer 2 solution that's not just about scalability but also community and mutual growth. In this guide, we'll dive into what makes Mode unique, how to deploy your first smart contract, and how to tap into Mode's innovative features like Sequencer Fee Sharing (SFS).
For web3 developers searching for efficiency and cost-effectiveness, Mode Network presents a practical platform. The assurance of Ethereum's security model, coupled with the benefits of a Layer 2 solution—swift transaction speeds and reduced costs—makes Mode an attractive platform for dapp deployment.
Mode isn't just another layer in the blockchain stack; it's a gateway to innovation and collaborative success. Let's explore some of the developer-centric features of Mode Network.
What is Mode?
Mode is an EVM-compatible layer 2 built with the Optimism stack and part of the Superchain. Mode is designed to foster a growth environment where anyone that helps the network grow, grows with the network. There are several mechanisms built into the protocol that help achieve this, like the SFS (Sequencer Fee Sharing), on-chain referrals, and more.
When deploying on Mode, you are not only participating in one L2 that’s isolated from the rest of web3, you are also participating in the Superchain. By deploying on Mode, you are eligible to participate in retroPGF rounds, the 1 billion dollar fund managed by Optimism.
Also, Mode looks to contribute to Optimism’s DeFi ecosystem, allowing for new and innovative projects to enjoy low gas fees and predictable revenue through the SFS and developer airdrops.
Now, let’s jump to what makes Mode unique as a L2 and all the things you need to know to take your developer experience in Mode to the next level.
Deploy your first smart contract to Mode
Deploy your first smart contract on Mode in less than 10 minutes. First of all, you will need to add Mode network to your preferred wallet in order to be able to see tokens and deploy smart contracts to Mode. Here’s the information for testnet and mainnet:
Mode Mainnet Info | |
Name | Value |
Network Name | Mode Mainnet |
RPC Endpoint | |
Chain ID | 34443 |
Currency Symbol | ETH |
Block Explorer |
Mode Testnet Info | |
Name | Value |
Network Name | Mode Testnet |
RPC Endpoint | |
Chain ID | 919 |
Currency Symbol | ETH |
Block Explorer | |
Bridge URL |
Now, you will need to get Sepolia ETH for testnet from a faucet to pay the fees for the deployment.
We are ready to get started!
For simplicity, we will be using Remix, an online IDE that is easy to get started with, allowing a simple deployment process, debugging, interacting with smart contracts, and more.
Here is sample code that comes as default on Remix, you can paste this in any .sol file:
// SPDX-License-Identifier: GPL-3.0

pragma solidity >=0.8.2 <0.9.0;

contract Storage {
    uint256 number;

    function store(uint256 num) public {
        number = num;
    }

    function retrieve() public view returns (uint256){
        return number;
    }
}
Now you need to compile your smart contract. Go to the Solidity Compiler tab and select the contract you want to compile. Click on "Compile", you can also enable "Auto Compile" for automatic compilation whenever you change the contract code.
PUSH0 opcode. You can read more on the issue with all the Optimism chains in the resources links at the end of this guide.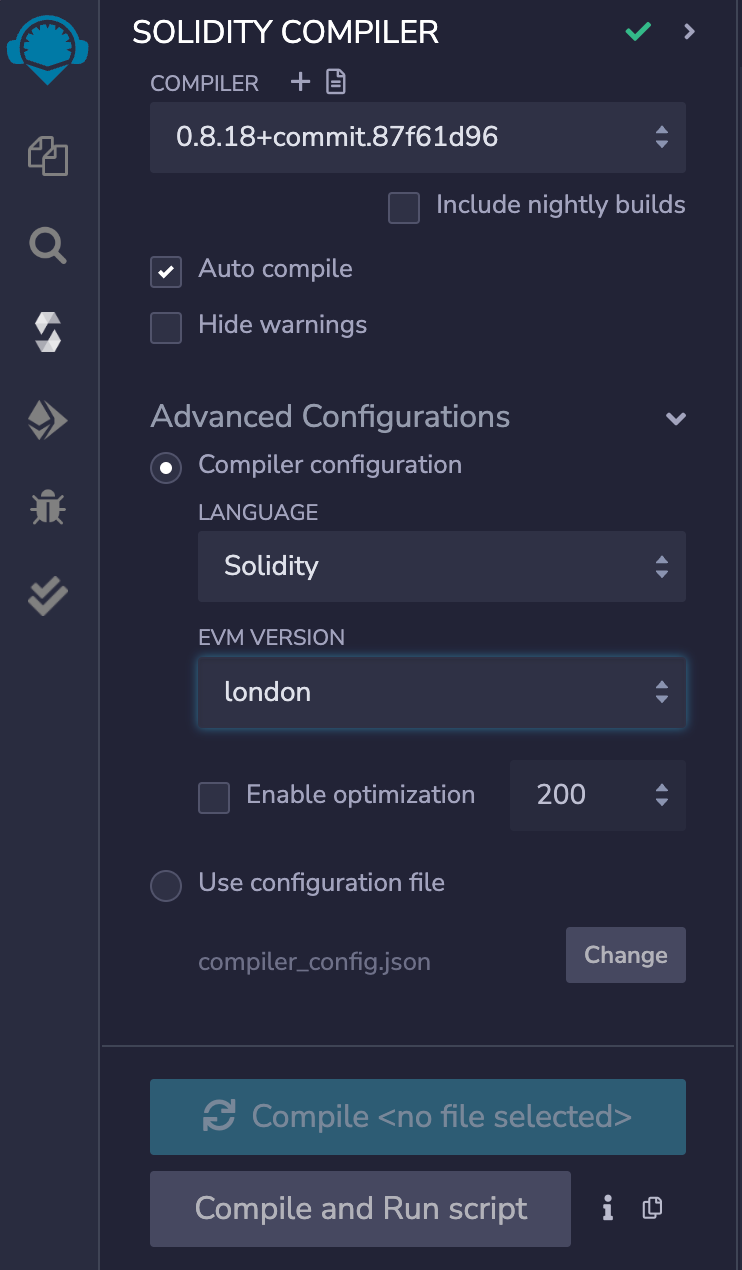
Once the smart contract is compiled successfully, switch to the Deploy & Run Transactions tab.
In the Environment dropdown menu, select Injected Provider - MetaMask; this will connect your MetaMask to Remix and allow you to make transactions from that connected wallet. In your wallet select Mode Testnet as the network before deploying.
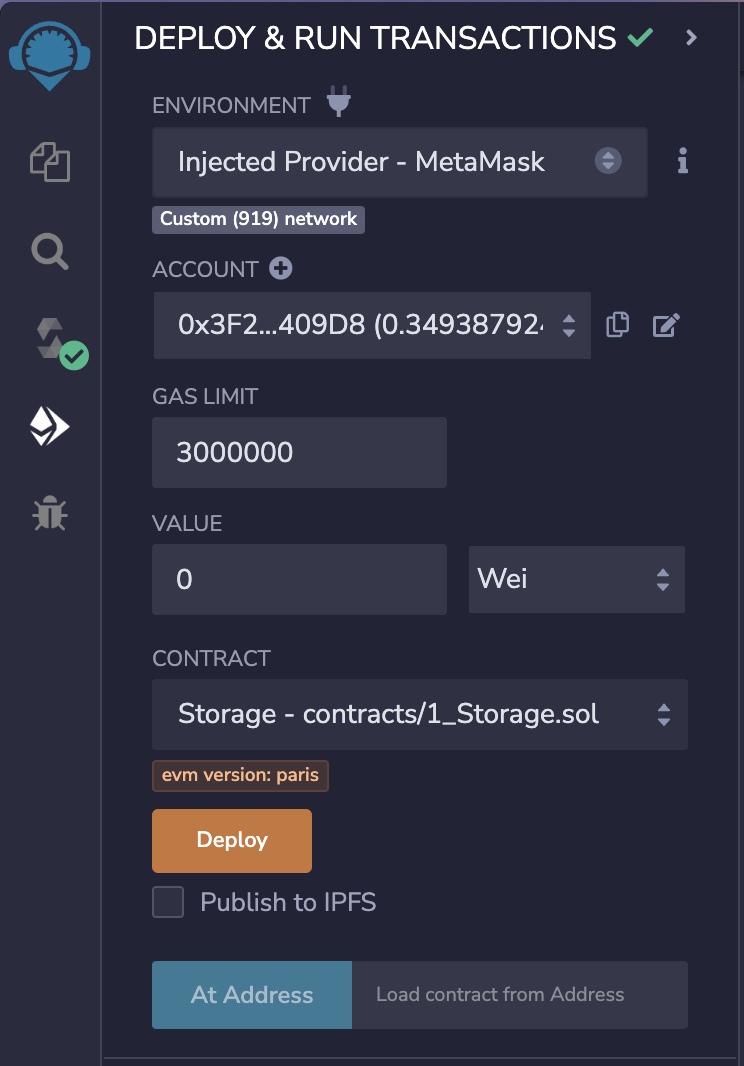
Select the compiled contract you want to deploy and click Deploy.
Now, MetaMask should pop up and ask you to confirm the transaction with super low fees.
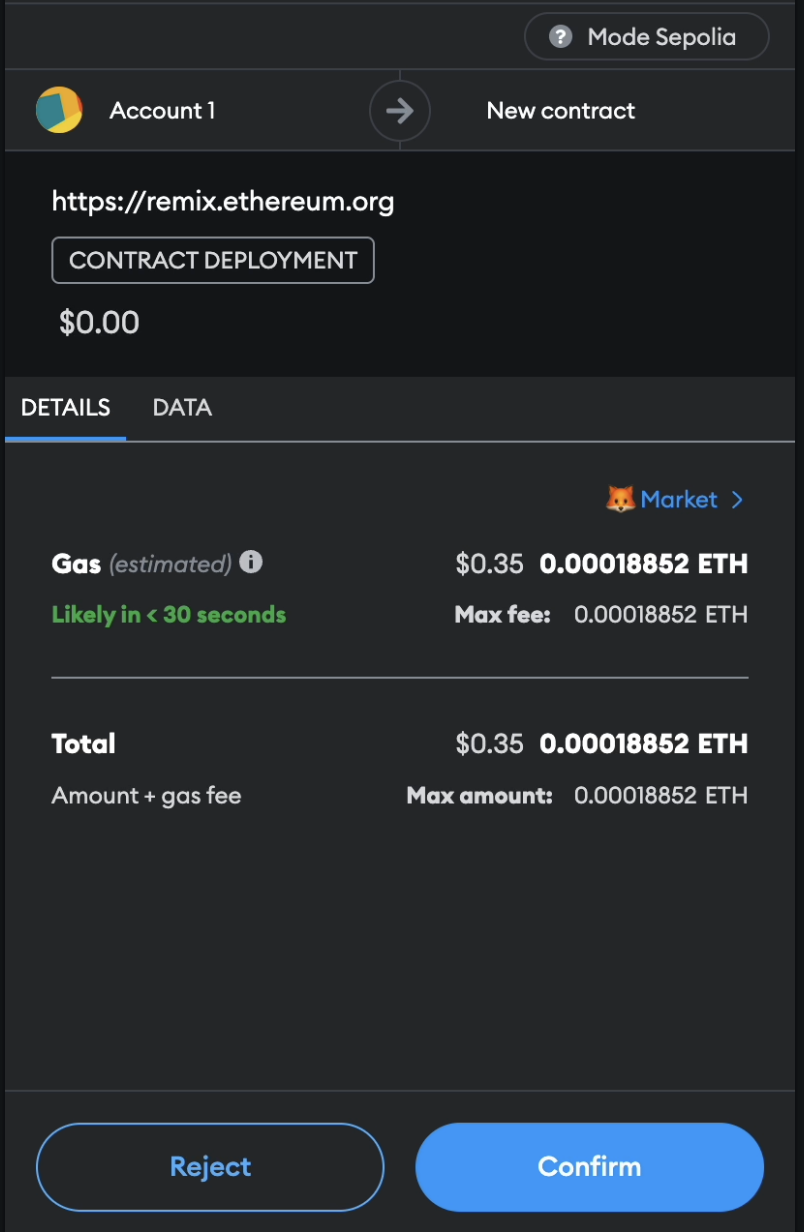
CONGRATULATIONS! You just deployed your first smart contract to Mode.
Introducing the SFS (Sequencer Fee Sharing)
When building a layer 2 with the OP stack, block production is primarily managed by a single party, called the sequencer, which helps the network by providing the following services:
Providing transaction confirmations and state updates
Constructing and executing L2 blocks
Submitting user transactions to L1
Until fault proofs are implemented in the OP ecosystem these sequencers are centralized for security and managed by Mode (as every other OP chain) and that’s why Mode benefits from all the sequencer fees generated. That’s where the SFS comes in, giving part of these fees and sharing them with developers that deploy smart contracts.
Developers can earn a share of the network sequencer fees just by registering their contracts in the Fee Sharing Contract.
The Sequencer Fee Sharing (SFS) contract acts as a registry where all the balances are tracked and stored. Once you deploy your contract and register it in the SFS, you will instantly start earning fees whenever your contract is used.
When you register your contract, the SFS mints an NFT as a claim to the earned fees. This NFT is sent to the _recipient that you specify when calling the register function. The SFS NFT allows anyone who possesses it to claim the rewards for that particular smart contract. Whether the NFT is in your wallet or a smart contract, whatever entity tries to withdraw the earnings needs to hold the NFT in order to withdraw funds.
Registering a contract
Registering a contract in the SFS means calling the “register” function defined in the SFS contract and getting an SFS NFT in exchange. The call to the register function must be made from your smart contract. This means you will have to add some code and logic to your contract in order to register it to the SFS. You’ll find code to do this later on this guide.
This is the register function from the SFS:
///@notice Mints ownership NFT that allows the owner to collect fees earned by the smart contract.

///`msg.sender` is assumed to be a smart contract that earns fees. Only smart       ///contract itself can register a fee receipient.

/// @param _recipient recipient of the ownership NFT

/// @return tokenId of the ownership NFT that collects fees

function register(address _recipient) public onlyUnregistered returns (uint256 tokenId) {
    address smartContract = msg.sender;

    if (_recipient == address(0)) revert InvalidRecipient();

    tokenId = _tokenIdTracker.current();
    mint(recipient, tokenId);
    _tokenIdTracker.increment();


    emit Register(smartContract, _recipient, tokenId);

    feeRecipient[smartContract] = NftData({
        tokenId: tokenId,
        registered: true,
        balanceUpdatedBlock: block.number
    });
}
There are 2 interesting things to note from the register function:
The register function receives (
address _recipient) as a parameter. This is the address where the NFT will be minted to.The SFS contract looks at the msg.sender in order to know what smart contract is being registered. This is why you need to call the register function from the contract you want to register. You can only do this once per contract.
You can only register your contract once and it will be linked to that NFT forever
Let’s go over an example of how to register a contract with a basic ERC20 contract:
// SPDX-License-Identifier: GPL-3.0

pragma solidity ^0.8.20;

import "https://github.com/OpenZeppelin/openzeppelin-contracts/blob/v5.0.0/contracts/token/ERC20/ERC20.sol";

interface Sfs {
    function register(address _recipient) external returns (uint256 tokenId);
}


contract ModeToken is ERC20 {

    address feeReceiver = msg.sender;

    constructor() ERC20("ModeTokenSFSTest", "SFST2") {
        //Example amount to mint our ERC20
        _mint(msg.sender, 1000  10 * 18);
        // This is the SFS contract address on testnet
        Sfs sfsContract = Sfs(0xBBd707815a7F7eb6897C7686274AFabd7B579Ff6);
        //Registers this contract and assigns the NFT
        //to the deployer of this contract
        sfsContract.register(msg.sender);
    }
}
As previously mentioned, you must call the register function from your smart contract. In this case we are using the testnet address of the SFS. Since we added the code to the constructor, this contract will be registered on deployment.
You can check a step-by-step tutorial on how to register a contract to the SFS in our docs.
Assigning to an existing SFS NFT
Assigning a contract to an SFS NFT means that the revenue generated by that smart contract can be claimed with this NFT. You are basically linking your smart contract to an existing NFT.
When you assign a contract there is no NFT being minted. This is useful when dApps have more than one smart contract then you can just register one contract to create the SFS NFT and assign the rest of the contracts to one SFS NFT. By doing this, you will have all the revenue from those contracts accumulated on one NFT.
This is the code of the assign function:
/// @notice Assigns smart contract to existing NFT.
/// That NFT will collect fees generated by the smart contract.
///         Callable only by smart contract itself.
/// @param _tokenId tokenId which will collect fees
/// @return tokenId of the ownership NFT that collects fees
function assign(uint256 _tokenId) public onlyUnregistered returns (uint256) {

       address smartContract = msg.sender;

       if (!_exists(_tokenId)) revert InvalidTokenId();

       emit Assign(smartContract, _tokenId);

       feeRecipient[smartContract] = NftData({
           tokenId: _tokenId,
           registered: true,
           balanceUpdatedBlock: block.number
       });
       return _tokenId;
 }
Here are a few things to note:
The assign function needs to be called by a smart contract and not an EOA. It’s the same as the register function at this point.
The assign function does not mint an ownership NFT, rather, it assigns your smart contract to an existing SFS NFT
You can only assign a contract that has not been assigned to an SFS NFT and will be assigned forever.
Let’s go over some example code on how to assign a contract to an existing NFT:
// SPDX-License-Identifier: UNLICENSED

pragma solidity ^0.8.9;

import "https://github.com/OpenZeppelin/openzeppelin-contracts/blob/v5.0.0/contracts/token/ERC20/ERC20.sol";

interface Sfs {
   function assign(uint256 _tokenId) external returns (uint256);
}

contract ModeToken is ERC20 {

    address feeReceiver = msg.sender;

    constructor() ERC20("ModeTokenSFSTest", "SFST2") {
        //Example amount to mint our ERC20
        _mint(msg.sender, 1000  10 * 18);
        // This is the SFS contract address on testnet
        Sfs sfsContract = Sfs(0xBBd707815a7F7eb6897C7686274AFabd7B579Ff6);
        // Call the assign function with our NFT token Id as param
        // Replace <YOUR_TOKEN_ID> with your own token ID
        sfsContract.assign(<YOUR_TOKEN_ID>);
   }
}
This basic ERC20 contract will assign itself to the NFT ID stated on <YOUR_TOKEN_ID>. This means that from now on, the contract will be assigned to that specific NFT and will generate revenue only claimable with this NFT. It’s probable that other contracts are also assigned to this NFT.
If you wanted to assign this contract to another NFT later on, the best practice is to have the assign call in a separate function that you can call whenever you want. Just be careful that only wallets with the correct permissions can change the SFS NFT assigned!
Withdrawal
The revenue of the SFS is calculated by an offchain component that distributes the fees at the end of each epoch. You will not see your balance immediately going up after registering your contract because this off-chain component updates the balances every 2 weeks on mainnet and every 24 hours on testnet.
To withdraw, you must hold the SFS NFT to be allowed to get the revenue. If not, the transaction will revert. It doesn’t matter if it’s an EOA (Externally Owned Account) or a smart contract, any of them must have the NFT in their balance in order to withdraw the funds.
This is the withdrawal function:
/// @notice Withdraws earned fees to _recipient address. Only callable by NFT owner.
/// @param _tokenId token Id
/// @param _recipient recipient of fees
/// @param _amount amount of fees to withdraw
/// @return amount of fees withdrawn

function withdraw(uint256 tokenId, address payable recipient, uint256 _amount)
        public
        onlyNftOwner(_tokenId)
        returns (uint256)
    {
        uint256 earnedFees = balances[_tokenId];

        if (earnedFees == 0 || _amount == 0) revert NothingToWithdraw();
        if (_amount > earnedFees) _amount = earnedFees;

        balances[_tokenId] = earnedFees - _amount;

        emit Withdraw(_tokenId, recipient, amount);

        Address.sendValue(_recipient, _amount);

        return _amount;
    }
Note that the function has the onlyNftOwner modifier which reverts the transaction if the entity calling the function is not the owner of the NFT.
There are 2 ways of claiming your funds:
Directly from a wallet that holds the NFT
Programmatically from a smart contract that should also hold the NFT
To withdraw the SFS earnings with a wallet all you have to do is hold the NFT in your wallet and call the withdraw function of the SFS contract. You will need these 3 pieces of information:
_tokenId: This is the ID of your SFS NFT. It's unique and it's incremental by 1 every time someone registers a contract._recipient: This is the address to where the earnings will be sent_amount: This is the amount to withdraw, if you set a higher amount than what corresponds to you, you will get to withdraw the total of the earned fees.
Once you know these variables, you just have to go to Testnet Blockscout or to Mainnet Blockscout depending on where your NFT and contracts are deployed.
Go to the Contract tab and select Write Contract
Look at the bottom for the 11. withdraw function
Input the tokenID, recipient and amount.
e.g: withdraw(203, 0x807CbE33a6F4c0F524C97B2AbcFf919da41cd7Cf, 2342342344)
Sign the transaction and wait until you get the rewards!
Conclusion
At Mode we believe that working together can achieve better results than individually. The web3 space has been PvP for too long and now we will see an ecosystem thrive due to working together.
We want developers to have an amazing experience while developing on Mode and enable them to build amazing and innovative dApps. Not only do we want you to participate and have fun in this new challenge, but we also believe you should be rewarded fairly.
That’s why inside the Mode ecosystem you can participate in several ways such as hackathons, writing articles for our community, ambassador programs, workshops, community calls, and much more. If you have a project, you can also contact our team to be part of our ecosystem and get help with marketing, and branding, and also explore some co-marketing ideas!
The SFS is not the only way Mode is rewarding developers for their contributions. We will also have developer airdrops and along with grants programs and retroPGF you will have a wide spread of opportunities to choose from. We also have an early devs telegram channel where we share some alpha and discuss technical topics. If you participate in Mode ecosystem, you’ll get in in no time.
Make sure to say hi in our Discord and make all the questions you may have, we love hard questions.
Additional resources: